Category: Home Services

Grease Interceptor and Grease Trap

A grease interceptor filters residual fats, oils, and grease (FOG) from wastewater as it leaves kitchen sinks. The FOG floats in the wastewater while solids settle, allowing clear water to flow through to the city sewer system.

Government regulations require commercial foodservice facilities to install grease traps and maintain them on a routine basis. FOG build-up can lead to sewage blockages in kitchen drains and in the city sewer lines. Click the Grease Trap Perth to learn more.

8 lbs 5GPM gallons per minute grease trap stainless steel grease trap for  restaurant | Shopee Philippines

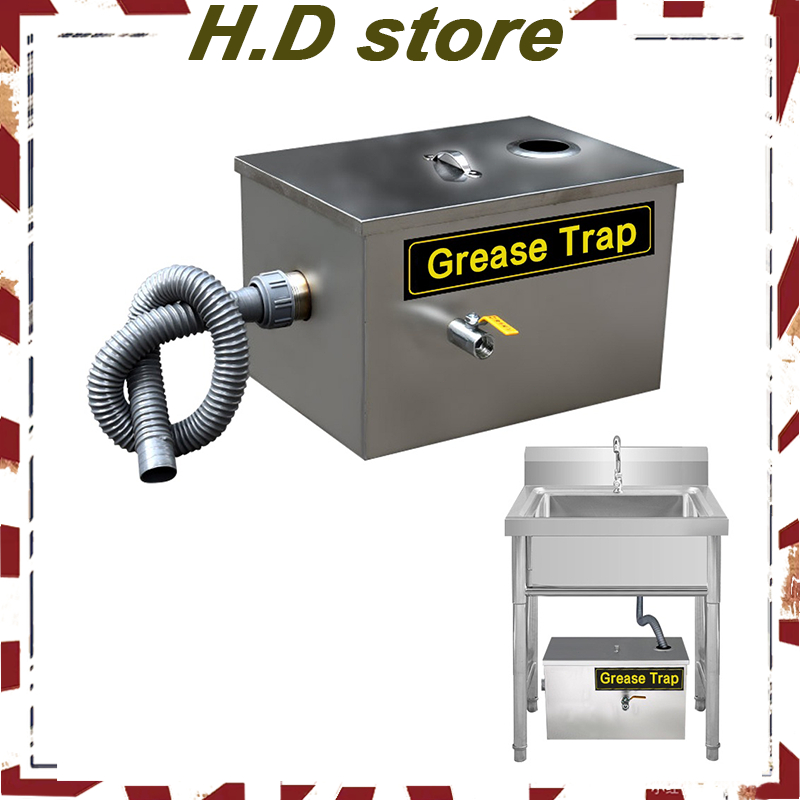
A grease trap is a container that separates fats, oils and greases (FOG) from wastewater before it enters the municipal sewer system. FOG, which also contains sugar and other solids, can gum up drain pipes and cause clogs. Health inspectors typically require large establishments to have grease traps or grease interceptors installed to protect the sewer system.

A typical grease trap consists of an inlet pipe, baffles and an outlet pipe. Wastewater flows into the inlet pipe and through the baffles to help slow the flow. The cooled water then passes through the outlet pipe into the sewer system. FOG floats at the surface of the grease trap while the rest of the wastewater sinks into the tank. The floats and other solids are then collected in the bottom of the trap.

Grease traps and interceptors are available in a range of sizes to meet the needs of different facilities. A restaurant’s FOG flow rate will determine the size and type of unit that is best for the site. For example, a small coffee shop may only need a smaller passive hydromechanical grease trap while larger restaurants or bakeries will require a much bigger passive or automatic FOG interceptor with a larger capacity to handle high-volume FOG flows.

Both types of grease traps need to be cleaned on a regular basis to remove the buildup of FOG and other solids. Depending on the size of your grease trap or interceptor and the volume of solid waste you generate, it should be cleaned every one to three months.

If you don’t maintain your grease trap regularly, it can cause backups and spills. This can lead to lost revenue for your restaurant, customer complaints and costly repairs. It can also pose a safety risk for your staff and create unpleasant or hazardous odors.

Keeping your grease trap clean helps protect the sewer system, avoids fines and provides a safer work environment for employees. It’s important to educate your staff on what can and cannot go down the drain, provide grease disposal containers for unsafe items and use a professional grease management service company to clean the traps on a routine schedule.

Why Install a Grease Trap?

Having a grease trap helps protect your kitchen plumbing from costly repairs. It also helps your business comply with sanitation and environmental regulations.

Grease traps are designed to intercept fats, oils and greases (FOG) in wastewater before it goes into your sewage system. Without a grease trap, FOG can solidify in pipes and cause foul odors, backups, clogs and sewer overflows. FOGs can even contaminate drinking water. A grease trap prevents these issues by catching and holding FOG waste while allowing other debris to pass through the drain.

While you could technically install a grease trap on your own, it’s best to leave installation to a professional. The right size, location and design are essential for a successful grease trap. An experienced plumber will take into account your kitchen’s volume and type of cooking, along with your local laws and sanitation requirements, to find the best grease trap for your establishment.

Once installed, your grease trap should be pumped regularly. The frequency depends on how much your business produces, but it’s generally every 1-3 months. It’s important to keep up with this schedule so your grease trap doesn’t get too full. A clogged or overflowing grease trap can lead to dangerous health and safety issues for workers and customers, as well as a major disruption to your business.

In addition to scheduling regular maintenance, it’s vital that your business follows proper disposal practices to minimize the amount of FOG that goes down your drains. This includes educating staff on what can and cannot go down the drain, providing separate garbage containers for unsafe items, and avoiding pouring FOG directly down the sink.

Not only are the FOGs that are poured down your drains a health and safety issue, but they can also block and restrict the flow of wastewater and cause expensive damage to your plumbing. A properly maintained grease trap keeps these contaminants out of the sewage system, where they can degrade municipal wastewater systems and pollute the environment.

Grease Trap Installation

Choosing the right grease trap and having it installed correctly is crucial to ensure a long-lasting and effective grease trap. It is recommended to hire a professional service provider who will help you choose the right size and type of trap for your facility, as well as get necessary permits and approvals from local authorities. They will also help you in performing regular maintenance, testing and inspections of your grease trap to ensure it is functioning properly.

The process of installing a grease trap involves digging a hole for the tank and connecting the inlet and outlet pipes. The inlet pipe carries wastewater from kitchen drains into the grease trap, while the outlet pipe carries treated water to the sewer system. It is important to make sure the inlet and outlet connections are sealed tightly to prevent leaks. It is also important to install a vent pipe to prevent the buildup of gases inside the trap.

A grease trap should be cleaned and pumped out on a regular basis to prevent blockages and ensure proper functionality. Regular maintenance and adherence to local regulations will also enhance the longevity of your grease trap.

While it might seem convenient to pour fats, oils and grease down the drain, doing so is a major health hazard and can cause serious issues for other establishments and for the local sewer system. Grease can build up and block drains, causing them to overflow or break. This can lead to expensive repairs and even environmental damage.

Grease traps are an effective solution to minimize the amount of FOG that enters sewer systems. They are a cost-effective way to protect your plumbing system and reduce costly blockages.

It is recommended to have your grease trap regularly inspected, tested and maintained by a professional service provider to prevent problems like overflows and spills. It is also important to train your staff on proper disposal practices to minimize the amount of grease and solids that goes down sinks.

Grease Trap Maintenance

Keeping a grease trap properly cleaned and inspected reduces the risk of plumbing problems, ensures compliance with health and environmental regulations, and extends the lifespan of the unit. Regular maintenance helps prevent clogs, overflows, and other problems that can disrupt kitchen operations and lead to costly repairs and fines.

When selecting a grease trap maintenance service, it’s important to find a company that provides professional, reliable services at an affordable price. A reputable firm will have experience working with a variety of different types and sizes of grease traps. They will also be familiar with local ordinances governing waste disposal and can help businesses avoid expensive fines by maintaining compliance.

Grease trap cleaning services should include power washing the exterior of the tank to remove built-up debris; pumping out wastewater and grease using a vacuum truck; scraping the walls of the trap to thoroughly clean them; disinfecting the inside of the trap; and dumping accumulated solids in accordance with local regulations. Services should also include educating staff on proper waste disposal practices, which can significantly reduce the amount of FOG that enters the trap.

A clogged or poorly maintained grease trap can cause unpleasant odors and even backups in the sinks and drains of the entire restaurant. It can also result in the costly replacement of the entire trap. Regular maintenance is crucial to the success of any commercial kitchen.

It’s recommended that restaurants have their grease traps cleaned on a consistent schedule, generally every one to three months. However, the exact frequency of cleaning will depend on usage volume, size of the trap, and local ordinances. If a grease trap has not been cleaned in a long period of time, it may be necessary to flush the trap by pouring water into it. This process should be done slowly and carefully, while wearing rubber gloves, protective coveralls, and a nose plug or gas mask to protect against hazardous fumes. Once the trap is empty, it should be inspected for cracks, dents, and other damage before being put back into service. A detailed inspection log should be kept to track grease volumes, cleaning schedules, issues, and repairs.

Why Ceiling Repairs Are Necessary

Ceiling Repairs Perth can improve a home’s energy efficiency and offer noise protection. They can also help to keep dust and allergens out of the living space.

While some minor cracks can be handled as DIY projects, structural issues require professional assistance. A service professional will determine the type of crack and address any underlying issues.

The Do's and Don'ts of Ceiling Repair

The ceiling is a vital part of any structure. It provides insulation, protects against weather elements and helps with soundproofing. Neglecting to repair or replace the ceiling can result in unsightly cracks and structural damage that can compromise safety and security. Cracks in the ceiling can range from mild hairline fractures to severe sagging that may indicate serious foundation or structural issues.

The severity of a ceiling crack depends on the size and location, as well as what is causing it. Cracks in a horizontal direction suggest that a truss uplift is occurring, while vertical cracks can indicate a weakened wall stud or an underlying foundation issue. In many cases, a professional will need to examine the situation to determine the cause and recommend the best course of action for repairing the problem.

If the cracks are shallow, they may simply need to be filled and sanded for a smooth finish. If the cracks are wide, it is important to consider whether there are any structural concerns and have them looked at by a professional. Cracks accompanied by sagging or other serious symptoms need to be taken very seriously and addressed immediately to ensure the stability of your home or business.

Water damage is another common reason for ceiling cracks. If the source of the leak is not corrected, it can lead to serious structural damage and mold growth. The first step is to find the source of the leak and have it repaired, then have the ceiling patched by a professional.

In some cases, cracks in the ceiling can be caused by heavy items being stored or placed on the ceiling. The weight of these items can cause the ceiling to sag and crack over time. If this is the case, the heavy items need to be relocated to a different area and the ceiling patched.

When working to patch ceiling cracks, it is important to remove any old paint or drywall compound from the surface before applying new materials. Once the crack has been cleaned, it is a good idea to apply some quick-setting joint compound on the surface. This will fill the crack and dry within 20 to 90 minutes, depending on your comfort level with working with these types of products. After the quick setting joint compound has been applied, you can apply your fiberglass tape and then regular joint compound on top of it being sure to feather out the edges so that the patch looks like a part of the ceiling. Once all of the joints compound has dried and been sanded, you can prime the area and repaint to match the rest of the ceiling.

Stains

Stains on a ceiling are a major source of frustration for many homeowners, as they often indicate a serious issue that requires prompt attention. If left untreated, stains can compromise the integrity of a home’s structural components by weakening materials such as drywall and wood beams. They can also serve as breeding grounds for mold and mildew, which can pose health risks for occupants. Finally, they can detract from a property’s value and lower its aesthetic appeal.

Water stains are typically caused by leaks from roofs, pipes, or other water sources. Because building materials like drywall and insulation are porous, the water from these leaks seeps quickly and can stain surfaces that are farther away from the source. Typically, these stains appear as discolored patches that range in color from light brown to dark yellow or black. They may also be accompanied by other signs of water intrusion, such as wet insulation and cracking plaster.

To identify the cause of a water stain, first inspect the area to determine whether it’s a current leak or one from a previous event. This will help you plan the most appropriate repair method. In addition, it’s important to note the location of the stains in relation to other structures in your home. If they’re located near bathrooms or kitchens, there is a high probability that the leak stems from plumbing problems. If they’re located in the attic or crawlspace, there’s a much higher likelihood that they’re caused by poor ventilation and condensation.

Once you’ve identified the cause of the problem, you should treat the affected area by cleaning it with a commercially available solvent. Be sure to wear gloves and protective gear as some solvents can be quite toxic. Once the stain has been cleaned, it’s a good idea to apply an oil-based primer that’s designed to block odors and moisture. It’s also a good idea to use a paint that’s specifically formulated for ceilings, as it will offer better coverage and prevent the stain from peeking through.

It’s also a good idea to monitor the affected area periodically and perform regular maintenance to help prevent future problems. It’s always a good idea to get professional roof inspections and perform periodic home inspections to ensure the safety and integrity of your structure.

Leaks

When water leaks into the ceiling, it can cause a host of problems including mold, wood rot, weakened building structure and other structural issues. Whether caused by a damaged roof, leaky pipes or weather conditions, a leaking ceiling should be repaired immediately.

Before repairing a ceiling leak, it’s important to shut off the water source in order to stop additional damage and prevent contaminated water from entering other areas of the home. Additionally, it’s recommended to move furniture and electronics away from the area in order to protect them. Finally, a bucket or pan should be placed under the leak to catch the water and prevent further damage.

Depending on the severity of the leak, the drywall or plaster may need to be removed in order to locate and repair the source of the leak. In addition, the area should be thoroughly dried to prevent fungus and mildew growth. This process can be expedited by using fans, dehumidifiers and heaters.

Once the area is dry, a new section of drywall can be installed and then painted with a water-resistant paint. It’s also a good idea to apply a sealant to the topcoat of paint in order to block future water stains and spots.

Hairline cracks in the ceiling are often a result of structural settling or temperature changes and can be easily fixed with joint compound or drywall mud patching. However, more significant cracks are a sign of underlying issues and should be addressed promptly to avoid structural damage and expensive repairs. Water stains on the ceiling are also an indicator of leaks and moisture issues, and can be corrected by addressing the source of the stain as well as ensuring that the affected areas are completely dry and painted properly. A professional can help you identify the source of the problem and determine the best approach for repairing it.

Sagging

A sagging ceiling can be a serious health and safety concern. If the problem isn’t dealt with quickly, the structural integrity of your home could be compromised. Sagging can be caused by a number of factors, including water damage, poor construction, and foundation shifts.

It’s important to have a professional building inspection done before buying a property, so you can be aware of any issues with the structure, such as sagging ceilings. This will help you determine if the sagging is due to normal wear and tear, or if it’s a sign of a larger problem that needs to be addressed.

If you’re considering purchasing a property with a sagging ceiling, it’s a good idea to contact a building and pest inspector first. This will allow them to identify the cause of the sagging and recommend any necessary repairs.

Sagging ceilings can be repaired using a variety of techniques, depending on the cause of the sagging. If the issue is due to water damage, a waterproofing solution may be required. Alternatively, the sagging may be caused by a lack of support from the timber ceiling joists. In this case, a strongback can be installed to increase the strength of the ceiling.

In some cases, additional work may be required to address the sagging, such as repairing leaks or controlling termite damage. In these instances, it’s a good idea to hire a specialist contractor.

The most common method of repairing a sagging ceiling is to pull down the wet materials, dry them out and then install a new plasterboard ceiling. This is a relatively simple process, but it’s important to take safety precautions when working on the ceiling. Be sure to turn off the electricity and shut off any water supply to the affected area. You should also make sure that any valuables, carpets and textiles are moved out of the way.

Sagging ceilings can be a sign of a major problem, so it’s important to have them repaired as soon as possible. A qualified contractor can provide an accurate diagnosis and carry out the necessary repairs to ensure your home’s safety and structural integrity.

5 Things to Consider When Planning a Kitchen Remodel

A full kitchen remodel is a comprehensive overhaul of your kitchen, often including significant structural changes. It’s ideal for homeowners seeking to create a luxurious and personalized kitchen environment.

A kitchen renovation is a more budget-friendly option that’s ideal for those who want to refresh their culinary space without altering its fundamental structure. These updates offer a more modest upgrade that can significantly improve functionality and enhance aesthetics. Contact Kitchen Remodel Tacoma now!

Small Kitchen Renovation and Design Ideas | HGTV

The layout of a kitchen is one of the most important decisions during a remodel. A well-thought-out layout will make the space efficient and comfortable to work in. It will also help you avoid any structural changes that may incur added costs and unforeseen delays.

The galley kitchen layout is a popular choice for tight spaces. It features two parallel walls with a walkway down the middle and appliances and cabinetry on both sides. This design is a great fit for streamlined workflows, particularly in commercial kitchens that need to minimize the distance staff needs to travel between stations.

An L-shaped kitchen is another flexible option for smaller spaces. This layout has countertops on two adjacent walls forming an “L” shape, making it easy to retain the golden kitchen work triangle. If you want to add an extra workspace, consider extending one arm of the “L” into the room to create a peninsula.

For larger open-plan spaces, consider a U-shaped kitchen layout to maximize counter and storage space. This design spreads the points of the kitchen work triangle over three adjoining walls – two parallel and one perpendicular to each other. In this design, you can place a central island or a breakfast nook in the corner, depending on your needs. Be sure to include plenty of seating in your kitchen to encourage a family-friendly atmosphere and increase usability.

Cabinets

Cabinets are the heart of any kitchen, so it’s important to consider their shape, style and configuration. They can make or break a room’s design, especially if you opt for custom options, which provide unlimited flexibility in terms of size, materials and layout.

Stock cabinets, available at home centers and kitchen showrooms, are typically stocked in standard widths, heights and depths. Their quality varies, but most are made with 1/2-inch MDF and have wood veneer or thermofoil doors. You can upgrade to plywood carcasses for an additional charge, and you may have a choice of door styles and finishes.

Face-frame cabinets have a wood frame attached to the front edges of the box, which covers the cabinet doors when closed. Traditional overlay doors abut the frame, but less conventionally, inset doors fit closely into the face frames for a clean look.

The body of a cabinet is usually constructed of plywood or higher-quality particle board, particularly for flat sections that don’t need to be shaped, such as shelves and cabinet sides. These materials are strong and relatively durable, and they’re less susceptible to warping from moisture. Cabinets are also available in a wide variety of shapes, sizes and finishes, including painted, stained or natural wood. Shaker-style cabinets, for example, are easy to clean because they lack intricate moldings that tend to collect dust. Other options include a glazed finish that can be hand-washed and an antimicrobial surface that repels bacteria and other harmful microbes.

Countertops

The countertops are where you dice up vegetables, roll out dough or set down the family’s favorite meal. They need to withstand the rigors of everyday living and serve as beautiful workhorses in the kitchen, but they also need to complement the overall aesthetic and match your style preferences.

Lighter-colored materials like quartz or white granite can amplify natural and artificial lighting, helping your kitchen to feel brighter and more spacious. On the other hand, dark surfaces like marble or soapstone absorb more of the light in the room and may make a small kitchen feel closed in.

In addition to determining which color and finish you prefer, consider your budget and durability needs. If you’re on a tight budget, laminate countertops are back in a big way with new patterns that mimic the look of stone, wood or quartz at a fraction of the cost. For a more sophisticated finish, resurfaced concrete and solid surface options are durable enough for food prep but still add a pop of visual interest to your kitchen.

Another option is to add integrated lighting beneath your counters or cabinets for a soft, subtle glow that highlights the colors and textures in the countertop. This can also help to reduce glare and eyestrain in busy areas of the kitchen. With recessed downlights, you can also use the right positioning to light up your upper cabinets and open shelving without casting harsh shadows on the countertops or walls.

Appliances

The kitchen is so much more than a place to cook. It’s a hub for family and friends, the place where we share meals and stories, the place that sets the stage for our daily lives. So it’s important to take the time to consider how you want your kitchen to function and make sure that your appliances support those goals.

Choosing new appliances can be an exciting prospect, especially with the latest technology on the market. From voice-activated UI systems to integrated operating systems, new appliance technology is becoming more and more integrated into the kitchen. This makes it easy to choose a new appliance that meets your design goals while providing the functionality you need.

Energy efficiency and sustainability are other important factors to consider when choosing kitchen appliances. Look for appliances that have built-in air and water purification systems to reduce their environmental impact and help you live a healthier lifestyle. You should also consider the materials used to make these appliances and how they can be recycled or biodegraded at the end of their lifecycle.

Lastly, it’s important to understand the maintenance requirements for your appliances to ensure that they are working as efficiently as possible. Regular cleaning, following the manufacturer’s instructions and scheduling professional servicing will help you get the most out of your new appliances. These simple steps can make a big difference in how well your kitchen appliances perform and their overall lifespan.

Flooring

Flooring is an important kitchen remodel component, and you’ll have plenty of options to choose from. However, choosing the right style depends on your kitchen’s aesthetic and how you intend to use the space. For example, a classic marble floor would be a perfect fit for a luxury kitchen, but might not work with your more casual design.

It’s also important to consider how your kitchen flooring will affect the rest of the room. If you choose a material that contrasts with your cabinets, it can make them look out of place. It’s best to avoid this issue by matching or coordinating your floor and cabinet color.

Many designers and builders prefer to install the flooring first, followed by the kitchen units. This method provides a seamless, continuous look that most homeowners find aesthetically pleasing. It also reduces the risk of kitchen unit installation causing damage to your new floor.

Whether you decide to follow the cabinets-first or flooring-first approach, it’s always wise to have a budget for your kitchen remodel and to stick to it. This will ensure that your remodel doesn’t become more extensive than you originally intended and put your project at risk of going over budget.

Once you have your budget in place, it’s time to start thinking about the overall kitchen layout. Some homeowners may want to opt for a galley kitchen design that places cabinets on three walls with a central island, while others might prefer a U-shaped layout that offers plenty of storage space.

Lighting

Your kitchen is where your family and friends gather, whether you’re sharing a meal or socializing over cocktails. Adding lighting to highlight focal points, showcase wall art and other decorative features, and brighten your cooking space are all ways to enhance this much-used area.

While both remodeling and renovation are often used interchangeably, the former refers to a complete overhaul of the room’s layout and design, while the latter simply refreshes surfaces and upgrades elements to add functionality. A kitchen remodel is also a great way to increase the overall value of your home.

The most important consideration when choosing the best kitchen lighting is balancing function with aesthetics. Decorative ceiling fixtures like chandeliers can provide ambient lighting that highlights the decor, while pendant lights and track lighting are popular options for illuminating kitchen islands. Under-cabinet lighting is another option for highlighting your countertops and other workspaces.

If you’re planning on spending a significant amount of time in your kitchen, choose materials that are easy to clean and durable enough to withstand heavy use. While trendy colors and materials may be tempting, it’s important to create a timeless design that will stand the test of time. Investing in high-quality appliances, adding smart technology and making sure all areas are properly illuminated will help your kitchen to shine for years to come.

How to Extend the Lifespan of Exterior Paint

Painting a home’s exterior may seem like a minor or superficial upgrade, but it actually offers several logistical advantages. These benefits include adding value to a house, shielding surfaces from damage, and reducing maintenance costs over time.

Exterior Painters Naperville IL have the knowledge, expertise, and experience to deliver exceptional results. These benefits also extend beyond curb appeal, increasing the value of a house and adding personal fulfillment to homeowners.

5 Reasons To Choose Professional Exterior House Painting Services Instead  Of DIY | Brush Brothers Painting

Curb appeal is a term that describes the first impression your home makes on viewers. It takes into account how attractive your home looks from the outside and how well-manicured its landscaping is. It also considers the quality of your home’s paint and other exterior features. Having a great curb appeal is important because it can make or break the likelihood of a potential sale.

According to studies, properties with a stunning exterior are more likely to sell faster and at higher prices. As a result, many homeowners strive to maximize their property’s curb appeal. One of the most effective and cost-efficient ways to boost your curb appeal is by investing in a new coat of paint. Exterior painting is a transformative project that can make your home look brand new and draw the eye of anyone who passes by.

Choosing the right colors is an essential part of any exterior painting project. Neutral tones are always in style and work with a variety of aesthetics, while bold accent colors can add character and charm. A professional residential painter can help you choose the best color for your property based on its architectural style, surrounding environment, and target audience.

Aside from the aesthetics, a fresh coat of paint can protect your property from weather damage. It acts as a barrier against rain, sun, and wind, which can damage the foundation of your home and lead to costly repairs. It’s also a great way to protect against insects and other pests that can harm your family or pets.

Whether you’re planning on selling your home or not, a good curb appeal can enhance your enjoyment of your property. It’s a way to show off your personality and make a statement that will be remembered. Plus, boosting your curb appeal can be a fun and satisfying DIY project that gives you a sense of accomplishment when it’s completed. Just make sure to hire an experienced and reputable exterior painting company. This will ensure that the job is done correctly and lasts for years to come.

Longevity

A quality exterior paint job is a major investment for any homeowner. The last thing anyone wants to see is their beautiful new paint job chipping or fading within just a year or two. Fortunately, with a few key painting tips, homeowners can significantly extend the lifespan of their exterior paint, saving them money and ensuring that their home looks its best for years to come.

Several factors affect the longevity of an exterior paint job, including the type and quality of paint used, environmental conditions, and surface preparation. To help homeowners extend the life of their exterior paint jobs, it is important to consider all of these factors when choosing a color and style for their home and to ensure that they hire competent commercial painters.

When deciding on a color for their home, homeowners should remember that lighter colors are more durable than darker shades. Darker colors absorb more heat from sunlight, which can cause them to fade faster than lighter shades. By selecting a more weather-resistant, low-maintenance shade, homeowners can extend the life of their paint job by 2 to 5 years.

The climate of a region is another important factor in the longevity of an exterior paint job. Harsh temperatures and extreme climate changes can lead to accelerated wear and tear on paint surfaces, making it essential that homeowners use high-quality exterior paints formulated for their specific climate.

Homeowners can also reduce the risk of premature deterioration by regularly assessing their exteriors for signs of damage or rot and taking prompt action to address these issues. In addition, regular touch-ups can help prevent small flaws from growing into larger problems and requiring costly repainting down the line.

In addition, to reducing the risk of premature deterioration, homeowners can greatly extend the longevity of their exterior paint jobs by using a professional power washing service to clean and remove any debris from the surface before applying fresh paint. Finally, it is essential that homeowners plan their painting projects during a period of mild, dry weather in order to ensure that the paint dries and cures properly.

Energy Efficiency

A fresh coat of paint can do more than boost curb appeal. It can also improve energy efficiency by reflecting sunlight and insulating the home. In sunny climates such as Temecula and Murrieta, these benefits can significantly lower utility bills. Energy efficient paints incorporate pigments or additives that reflect a significant percentage of the sun’s radiant heat, which can reduce air conditioning consumption.

In addition to lowering energy consumption, the reflective properties of these paints also help to maintain a more consistent indoor temperature, reducing the need to continually adjust heating and cooling systems. This can help to cut utility bills and create a more sustainable lifestyle for your family.

Professionally applied coatings can also seal gaps and cracks to prevent air leakage and increase the insulated value of a house. This can improve airtightness and reduce conditioned air loss, allowing your household to consume less energy.

Regularly painting your exterior can extend the lifespan of building materials and protect them from weathering, UV damage, and moisture intrusion. This can reduce maintenance costs and prolong the life of your home. Additionally, painting can provide an extra layer of insulation and protect surfaces from wind and rain, which can reduce heating and cooling costs.

When selecting the best paint color, it’s important to consider both your personal taste and the look of your neighborhood. A paint color that fits in with the neighborhood can enhance your curb appeal and make your home more recognizable to potential buyers. Choosing neutral tones is often a safe choice, as they tend to be more appealing to a wider audience.

While enhancing curb appeal and boosting resale value are important factors, energy efficiency should never be sacrificed for aesthetics. The right mix of aesthetically pleasing colors and energy-efficient paints can offer the best of both worlds, ensuring that your home is both beautiful and energy-efficient. Professionally trained painters understand how to properly apply these types of paints, ensuring that they perform as intended. This includes meticulous surface preparation, application, and finishing techniques to deliver superior results. This attention to detail ensures that your energy-saving paint will last longer and continue to function as designed.

Preventive Maintenance

Your exterior paint is more than just a decorative element. It provides a protective layer against harsh weather conditions such as rain, snow, UV rays and extreme temperature shifts that can damage the underlying materials and cause structural issues. Regular maintenance is vital to protecting your home from these damaging conditions. By cleaning surfaces and addressing any signs of wear, you can extend the life of your exterior paint.

Dirt, mold, mildew, and other organic growth on the surface of your paint can break it down over time. It’s recommended to clean the exterior of your house at least once or twice a year with a mild detergent and water to remove any built-up debris. You can use a power washer or hand wash, depending on the degree of dirtiness and nature of the surface. Inspect your exterior surfaces for cracks, chipping, blistering or peeling and address them as soon as you notice them. This prevents the problems from getting worse and saves you money in the long run on costly repairs or repainting projects.

It’s important to keep a small supply of your home’s paint color on hand for touch-ups as you notice chips, cracks or other signs of deterioration. You can also keep the area around doors and windows clean to avoid moisture from seeping into the walls and damaging the underlying materials. It’s also helpful to trim bushes and trees regularly so they aren’t rubbing against your painted surfaces and scratching them up.

If you don’t feel comfortable tackling this task on your own, a professional exterior painter can help. They’re able to complete the job quickly and efficiently, saving you time and stress. Plus, they can provide expert advice on color selection, application methods, and techniques that will ensure your next painting project is a success. They can even provide an estimated cost for your project, allowing you to budget accordingly. Reputable painters are insured and offer warranties for their services, so you can rest assured that your investment is protected.

Navigation