
Ceiling Repairs Perth can improve a home’s energy efficiency and offer noise protection. They can also help to keep dust and allergens out of the living space.
While some minor cracks can be handled as DIY projects, structural issues require professional assistance. A service professional will determine the type of crack and address any underlying issues.
The ceiling is a vital part of any structure. It provides insulation, protects against weather elements and helps with soundproofing. Neglecting to repair or replace the ceiling can result in unsightly cracks and structural damage that can compromise safety and security. Cracks in the ceiling can range from mild hairline fractures to severe sagging that may indicate serious foundation or structural issues.
The severity of a ceiling crack depends on the size and location, as well as what is causing it. Cracks in a horizontal direction suggest that a truss uplift is occurring, while vertical cracks can indicate a weakened wall stud or an underlying foundation issue. In many cases, a professional will need to examine the situation to determine the cause and recommend the best course of action for repairing the problem.
If the cracks are shallow, they may simply need to be filled and sanded for a smooth finish. If the cracks are wide, it is important to consider whether there are any structural concerns and have them looked at by a professional. Cracks accompanied by sagging or other serious symptoms need to be taken very seriously and addressed immediately to ensure the stability of your home or business.
Water damage is another common reason for ceiling cracks. If the source of the leak is not corrected, it can lead to serious structural damage and mold growth. The first step is to find the source of the leak and have it repaired, then have the ceiling patched by a professional.
In some cases, cracks in the ceiling can be caused by heavy items being stored or placed on the ceiling. The weight of these items can cause the ceiling to sag and crack over time. If this is the case, the heavy items need to be relocated to a different area and the ceiling patched.
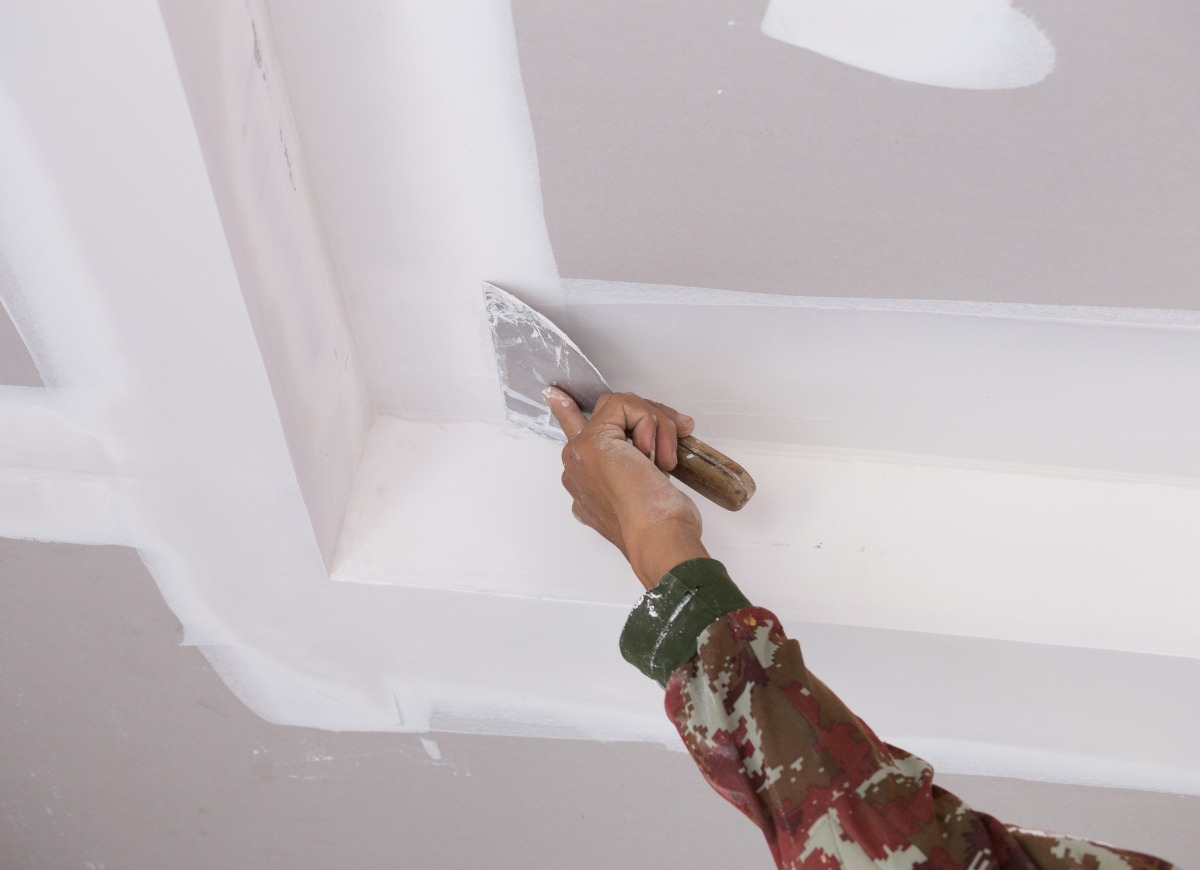
When working to patch ceiling cracks, it is important to remove any old paint or drywall compound from the surface before applying new materials. Once the crack has been cleaned, it is a good idea to apply some quick-setting joint compound on the surface. This will fill the crack and dry within 20 to 90 minutes, depending on your comfort level with working with these types of products. After the quick setting joint compound has been applied, you can apply your fiberglass tape and then regular joint compound on top of it being sure to feather out the edges so that the patch looks like a part of the ceiling. Once all of the joints compound has dried and been sanded, you can prime the area and repaint to match the rest of the ceiling.
Stains
Stains on a ceiling are a major source of frustration for many homeowners, as they often indicate a serious issue that requires prompt attention. If left untreated, stains can compromise the integrity of a home’s structural components by weakening materials such as drywall and wood beams. They can also serve as breeding grounds for mold and mildew, which can pose health risks for occupants. Finally, they can detract from a property’s value and lower its aesthetic appeal.
Water stains are typically caused by leaks from roofs, pipes, or other water sources. Because building materials like drywall and insulation are porous, the water from these leaks seeps quickly and can stain surfaces that are farther away from the source. Typically, these stains appear as discolored patches that range in color from light brown to dark yellow or black. They may also be accompanied by other signs of water intrusion, such as wet insulation and cracking plaster.
To identify the cause of a water stain, first inspect the area to determine whether it’s a current leak or one from a previous event. This will help you plan the most appropriate repair method. In addition, it’s important to note the location of the stains in relation to other structures in your home. If they’re located near bathrooms or kitchens, there is a high probability that the leak stems from plumbing problems. If they’re located in the attic or crawlspace, there’s a much higher likelihood that they’re caused by poor ventilation and condensation.
Once you’ve identified the cause of the problem, you should treat the affected area by cleaning it with a commercially available solvent. Be sure to wear gloves and protective gear as some solvents can be quite toxic. Once the stain has been cleaned, it’s a good idea to apply an oil-based primer that’s designed to block odors and moisture. It’s also a good idea to use a paint that’s specifically formulated for ceilings, as it will offer better coverage and prevent the stain from peeking through.
It’s also a good idea to monitor the affected area periodically and perform regular maintenance to help prevent future problems. It’s always a good idea to get professional roof inspections and perform periodic home inspections to ensure the safety and integrity of your structure.
Leaks
When water leaks into the ceiling, it can cause a host of problems including mold, wood rot, weakened building structure and other structural issues. Whether caused by a damaged roof, leaky pipes or weather conditions, a leaking ceiling should be repaired immediately.
Before repairing a ceiling leak, it’s important to shut off the water source in order to stop additional damage and prevent contaminated water from entering other areas of the home. Additionally, it’s recommended to move furniture and electronics away from the area in order to protect them. Finally, a bucket or pan should be placed under the leak to catch the water and prevent further damage.
Depending on the severity of the leak, the drywall or plaster may need to be removed in order to locate and repair the source of the leak. In addition, the area should be thoroughly dried to prevent fungus and mildew growth. This process can be expedited by using fans, dehumidifiers and heaters.
Once the area is dry, a new section of drywall can be installed and then painted with a water-resistant paint. It’s also a good idea to apply a sealant to the topcoat of paint in order to block future water stains and spots.
Hairline cracks in the ceiling are often a result of structural settling or temperature changes and can be easily fixed with joint compound or drywall mud patching. However, more significant cracks are a sign of underlying issues and should be addressed promptly to avoid structural damage and expensive repairs. Water stains on the ceiling are also an indicator of leaks and moisture issues, and can be corrected by addressing the source of the stain as well as ensuring that the affected areas are completely dry and painted properly. A professional can help you identify the source of the problem and determine the best approach for repairing it.
Sagging
A sagging ceiling can be a serious health and safety concern. If the problem isn’t dealt with quickly, the structural integrity of your home could be compromised. Sagging can be caused by a number of factors, including water damage, poor construction, and foundation shifts.
It’s important to have a professional building inspection done before buying a property, so you can be aware of any issues with the structure, such as sagging ceilings. This will help you determine if the sagging is due to normal wear and tear, or if it’s a sign of a larger problem that needs to be addressed.
If you’re considering purchasing a property with a sagging ceiling, it’s a good idea to contact a building and pest inspector first. This will allow them to identify the cause of the sagging and recommend any necessary repairs.
Sagging ceilings can be repaired using a variety of techniques, depending on the cause of the sagging. If the issue is due to water damage, a waterproofing solution may be required. Alternatively, the sagging may be caused by a lack of support from the timber ceiling joists. In this case, a strongback can be installed to increase the strength of the ceiling.
In some cases, additional work may be required to address the sagging, such as repairing leaks or controlling termite damage. In these instances, it’s a good idea to hire a specialist contractor.
The most common method of repairing a sagging ceiling is to pull down the wet materials, dry them out and then install a new plasterboard ceiling. This is a relatively simple process, but it’s important to take safety precautions when working on the ceiling. Be sure to turn off the electricity and shut off any water supply to the affected area. You should also make sure that any valuables, carpets and textiles are moved out of the way.
Sagging ceilings can be a sign of a major problem, so it’s important to have them repaired as soon as possible. A qualified contractor can provide an accurate diagnosis and carry out the necessary repairs to ensure your home’s safety and structural integrity.